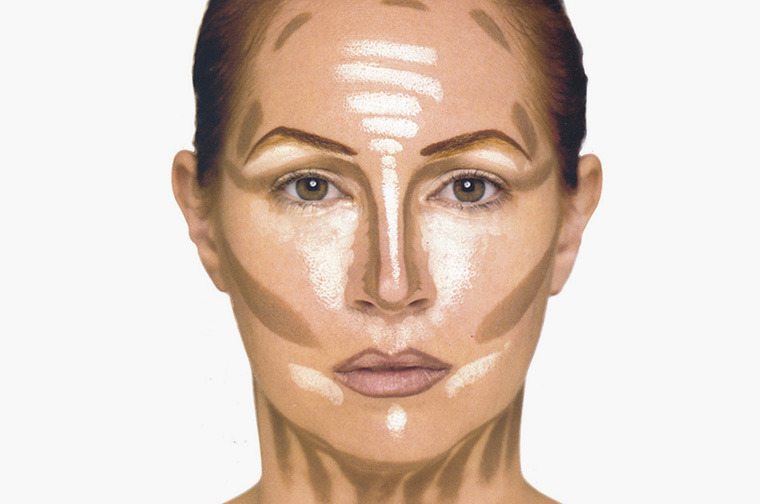
Ever since Hollywood red carpets got flooded with pronounced cheek bones and defined facial features, there have been many makeup experts coming up with contouring techniques to give you the same professional results that make you look just like a star!
Here we give you 5 easy-to-follow steps to the perfect contour:
Step 1: CONCEALER
In case you have certain darker or lighter spots on your face than your natural tone, concealer can come in handy. Here’s an important tip: do not apply it and leave it to dry – instead, blend it in so that your skin does not appear splotchy. Also, use a concealer that is waterproof and will not run if you start sweating. This is the first and primary bit of makeup that you would need to apply to eradicate as much imperfectness as possible.
Step 2: FOUNDATION
The second step for your makeup procedure should include applying foundation. Not only will it hide blemishes and possible dark circles under the eyes, but it will also even out your skin tone. Sometimes because of the sun, pollution, unhealthy lifestyle and for other reasons, your skin may appear dull and patchy – foundation helps eliminate all that. Do not be modest when applying it and make sure you use a sponge or a brush to distribute it evenly over your entire face and neck.
Step 3: DEFINING LINES
Follow this step for a perfect contour that will leave your cheek bones defined. With an angled brush draw a line from the corner of your mouth to our ears. For better results, first pucker your lips like a fish and follow the curves that are formed. Make sure that the lines are thin and not thick and also that they are blended, otherwise the contouring lines will look completely fake. Either use a blending brush or your own finger to smoothen everything out.
Step 4: DRAWING LINES
A great part about contouring is that you can literally change the shape of your face by drawing lines at different places on your face and blending them accordingly. For example, when it comes to your forehead, if you want to increase or decrease its size, you can do that by drawing lines. For your nose, draw a line starting from the beginning of your eyebrows down to the tip of your nose. The closer the lines are, the thinner your nose will appear. The same thing will happen with your chin.
Step 5: BLENDING
The last step is about giving the final touches to the masterpiece! If there are more features you would like to define better, then you can go ahead and do it right at the end. Also, blend as much as you can! Your make up needs to look as natural as possible, not like a cake with icing! Use brushes, sponges, your fingers and anything else you can to make all the contouring come together.
For a complete tutorial on contouring for beginners, click HERE.


